These button painting are made by taking a blank canvas, adding paint, mixed with a bit of imagination, a smidgen of creativity and a few buttons. Presto, chango, you have art!
The paint I used was a combination of the acrylic paint that can be purchased at any craft store, and some oops sample paint I bought on clearance at my local hardware store. (I love a good bargain!)
First, let's create the background by taking the darker paint and then blending it with the lighter paint. You'll want to work rather quickly, as acrylic paint dries pretty fast, and once it's dried, it's set. With the paint wet, you'll add each color, one at a time, blending one color into the next, avoiding any sharp lines of color.
Until finally, you have a blended color background.
Set it aside and let it dry completely.
(Since I was working on several of these at one time, you'll notice the backgrounds may be different in some of the following photos. The technique though is the same.)
Okay, let's make the tree! Using the acrylic craft paint, paint out your tree. I like to use a contrasting color for the tree, and I learned the hard way that it's much easier to use a smaller brush to paint the trees than it is to use one too big. (Although the smaller brush may take more time, it gives you more control of what your end result looks like.)
(Sorry for the glare on the pic!)
Once everything is dry, you can start selecting your buttons.
You can use matching color buttons, or a mix of color buttons, or all the same type or same size--it's up to you.
Before you glue your buttons, do a dry placement (without glue). This allows you to decide where to place the buttons without smearing glue all over your painting.
A word about the glue. I used simple craft glue (not something like Elmer's glue) that I picked up at my local craft store. I don't think the brand matters as much, as long as it dries transparent! Make sure your glue dries clear!!!!
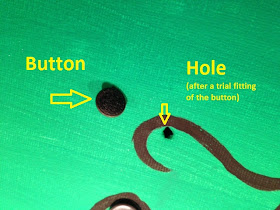
What about those buttons with the little pieces on the back that raise them off the surface? Take an Exacto knife (or razor blade) and put a little X-shaped hole in your canvas wherever you want your button to be.
"CUT INTO MY CANVAS?!?!" you might be saying. Yes, that's exactly what you want to do, but cut a tiny, itty-bitty X-shaped hole. You can always cut larger if you need to. You want a hole just big enough to slip the back of the button through it.
Once you have your button placement figured out, start gluing! A little dab on the back of each button is all you need. When the glue is dry, you're ready to move onto the next step--edging your art.
Unless I'm using a frame (which I'm not on these), I like to use black paint to give the edges a finished look. Simply use black acrylic paint to paint the outside edges of the art.
Again, let everything dry. When it's all dry, then it's ready to hang!
Blue background with yellow tree and mix of yellow and blue buttons.
Green background with dark brown three and mix of brown buttons and brown beads.
Red & yellow background with black tree and a mix of red and black buttons.
I like them hung together for a more dramatic impact.


No comments:
Post a Comment